

This time of year, visions of sugary treats dance through the kitchen, especially when family will be gathering ‘round the table. Showcase some seasonal sweets at parties and family dinners, and make sure the kids are part of creating this year’s family food crafts. After all, it’s tasty winter treats and time with loved ones that make this time of year so magical.
The Joy Of Gingerbread
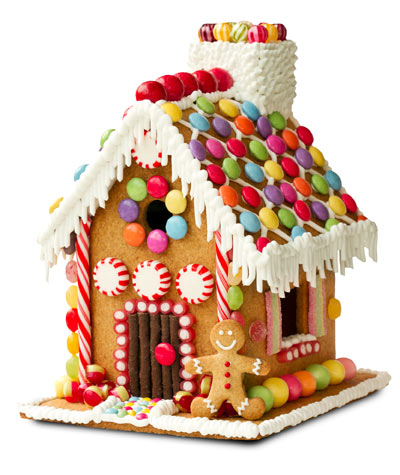
IF YOU BUILD IT…
We’ve gathered enough tips and tricks to build an entire gingerbread neighborhood, so the sooner the baking begins, the better. First things first, it’s time to whip up some gingerbread construction materials. Here’s a recipe that will keep any cookie abode standing ‘til the New Year and one for the icing to hold it all together.
Classic Gingerbread
Makes about 3 lbs dough
5 cups bread flour 2 tbsp ground cinnamon 1tbsp ground cloves 1 tbsp ground ginger 1¼tsp baking soda ¼ tsp salt 1 cup plus 2 tbsp granulated sugar ¾cup light corn syrup ½ cup (1 stick) plus 7 tbsp margarine ¼cup plus 2 tbsp whole milk
Combine bread flour, spices, baking soda and salt in a large bowl. Set aside. Combine sugar, corn syrup, margarine, and milk in a large stainless steel or coated saucepan. Place pan over medium to medium-high heat. Stir until butter is completely melted and the mixture is the consistency of thick syrup. Remove pan from heat, and add half of reserved dry ingredients. Mix until smooth. Add remaining dry ingredients, and mix until flour is incorporated. Cover surface of dough with plastic wrap, and cool to room temperature. Flatten dough into a disk. Wrap tightly in plastic, and refrigerate several hours or until firm enough to roll without sticking. Position a rack in the center of the oven, and preheat the oven to 375°F. Line cookie sheets with parchment paper or baking mats, and set aside. Roll dough about 3⁄16-inch thick for sturdy cutouts but no less than 1⁄8-inch thick. Baking time will vary with cookie size and thickness. Bake until cookies are firm to the touch and lightly browned around the edges. For large-scale support pieces, it is especially important to bake cookies all the way through. Let cookies cool on cookie sheets before transferring to wire racks. Cool completely before frosting.
Recipe courtesy of Julia M. Usher’s Ultimate Cookies, copyright Gibbs Smith, 2011.
Recommended gingerbread house templates: Two 3×5-inch rectangles for front and back Two 3×5 ½-inch rectangles for roof Two pieces, 3 inches wide at base, 3 inches to roof line, slanted to a peak 5 ½ inches from the bottom
To add an entryway: Four 1½ x1-inch rectangles for the roof and sides of entryway 2 inches wide at base, 1½ inches to roof line, slanted to a peak 2½ inches from the bottom
Source: foodnetwork.com.
Royal Icing
2 lbs powdered sugar ½tsp cream of tartar 5large egg whites, cold Flavor of choice, like vanilla extract Gel food coloring (optional)
Combine powdered sugar and cream of tartar. Mix in egg whites by hand to moisten dry mixture. Beat mixture on low speed with electric mixer until egg whites are evenly incorporated. Scrape down sides of bowl and mix on high for 2 to 3 minutes. Beat in flavor and color as desired.
Recipe courtesy of Julia M. Usher’s Ultimate Cookies, copyright Gibbs Smith, 2011.
…They Will Decorate
With construction completed, it’s time to decorate, but don’t make another cookie-cutter casa this year. Instead, take a tip or two from our winter-ior design guide.
For a little gingerbread house on the prairie, frosted wheat cereal makes for a perfect thatched roof. Not only are they lightweight, but they already look covered in snow, perfect for a wintry cottage.
Even gingerbread families need to stay warm, so supply a Tootsie Roll or pretzel stick log pile to last them through the cold season.
Fruit leather makes a great doormat and can be cut into any size or shape. It’s durable enough to last the whole season wiping gingerbread shoes.
Create the perfect path to the front door with rock candy. This sweet take on real gravel comes in every color to match any theme.
Need a fence to keep in the gingerbread dog? Line the yard in pretzels end-to-end for a whimsical yet crunchy barrier.
Source: grinandbakeit.com.
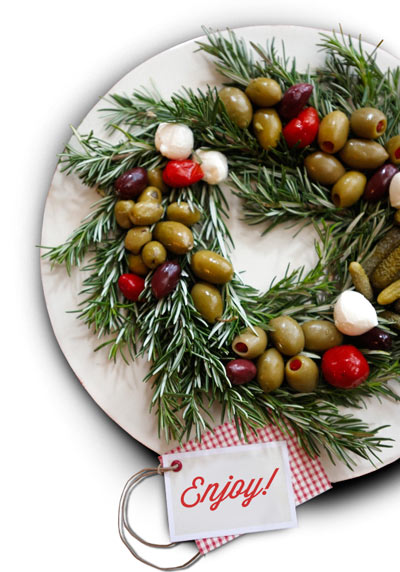
Deck The Table
This edible wreath brings seasonal foliage right to the table. Break from the sugar rush with this savory appetizer. It’s an easy food craft for kids to prepare, and they’ll be proud to tell the family it was all them. All it takes are some fresh rosemary sprigs. The toppings are dealer’s choice, but an even mix of olives, cherry tomatoes and fresh mozzarella balls incorporates the colors of the season. Just arrange the sprigs on a plate and top them with the goodies. Just make sure grandpa doesn’t accidentally eat any rosemary.
Recipe and photo courtesy of Julia M. Usher.
Interactive Crafting
At this year’s family get-together, set up a crafting and snacking station at a side table to keep kids entertained. A few of the big kids may wander over to check it out, too once they see it’s loaded with goodies. But hey, there won’t be much to clean up if all the supplies get eaten.
Serve up some cold milk in vintage milk bottles for a chic touch. This way kids will have something healthy to sip while they make and eat all their sweets. Dishing out supplies in glass jars takes the look up another level.
Make the candy interactive by using ring-shaped sweets so little ones can run ribbons through the middle. Invest in candy ribbon and the real stuff so they can make their own candy ornaments and even a garland to string up after dinner. Chocolate-covered pretzels, popcorn, cranberries, cereal and peach rings are all great options.
Encourage kids’ spirit of giving by supplying string to make candy jewelry to bestow on loved ones later on. Who doesn’t love a good Lifesaver necklace?
Give out goodie bags before families and children leave so they can carry their creations home safely.
Source: hgtv.com.
Stringing Up Popcorn
What’s more traditional than homemade popcorn garlands hanging all over the house? Here’s a quick how-to to get every hall decked to the nines.
Pop a large bowl full of popcorn. For extra no-crumble power, let it sit out for a day and get stale. Without cutting it from the spool, thread a needle and begin threading popcorn pieces onto the string. Once the string is long enough and full enough, snip the thread and tie it off to prevent pieces from falling off. String the new garland up where everyone can see it.
Source: wikihow.com
A Pop of Sweetness
Cake pops are so easy to customize and are all the rage this season. Don’t leave it to the bakeries and domestic goddesses to bake up those yummy cake balls. Check out this recipe to create any flavor pops using a simple box mix as the base.
Basic Cake Balls
Makes about 4 dozen cake balls
1box of cake mix 9×13 inch cake pan 1Large mixing bowl 116-oz container ready-made frosting Large metal spoon Wax paper 2 baking sheets Plastic wrap 32 oz (2 pounds) candy coating Deep, microwave-safe plastic bowl Toothpicks Resealable plastic bag or squeeze bottle (optional)
Bake cake as directed on the box, using a 9×13-inch cake pan. Let cool completely. Once cake is cooled, slice into 4 equal sections. Remove a section from the pan, break in half and rub the two pieces together over large bowl. Crumble any large pieces that fall off. Repeat with each section until the entire cake is crumbled into a fine texture. Add three-quarters of the container of frosting. Mix into crumbled cake, using the back of a large metal spoon, until thoroughly combined. Do not use the entire container, as the cake balls will be too moist. Roll into 1 1/2-inch balls by hand, and place them on baking sheet lined with wax paper. Cover with plastic wrap, and chill for several hours in the refrigerator or place in the freezer for about 15 minutes. Do not decorate until firm.
Tasty Tip: If there is candy coating left over, pour it into a squeeze bottle or resealable plastic bag and snip off the corner. Drizzle even more coating over the tops in a zigzag motion to add an extra touch of texture. Use a mini ice cream scoop to get cake balls that are uniform in size.
Images and text copyright Angie Dudley
While That’s Baking…
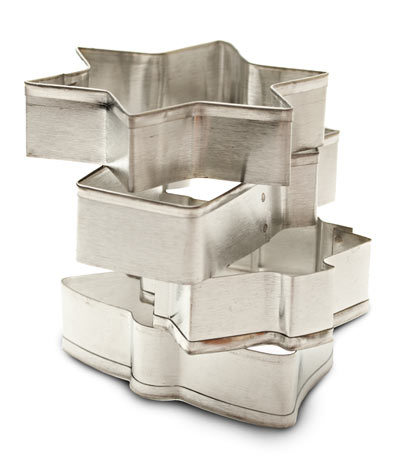
Cookie cutters are cute, but if they’re only for a one-time use, get them out of the kitchen junk drawer by turning them into a wreath. This is a food craft unlike the rest and the perfect way to kill time waiting for the cookies to finish baking. All it takes is some metal cookie cutters, thin wire, spray paint and a pretty ribbon.
Take those cookie cutters outside and spray ‘em down in any seasonal color. Once dry, join them together in a circle using the wire. Attach the ribbon where it looks best and voila! This new wreath is perfect for the front door—but even better for the oven door. Source: kraftrecipes.com
Frosting THE SNOWMAN Florida Decembers don’t provide snow for building snowmen, but with the right recipe, he can still come to life in the kitchen. Take some of those yummy cake balls and dress them up with corn-cob pipes and button noses.
48 uncoated cake balls, formed into pear shapes 48 oz white candy coating Microwave-safe bowl 48 paper lollipop sticks 48 orange candy-coated sunflower seeds 96 chocolate jimmies Styrofoam block Toothpicks 144 blue confetti sprinkles Black edible-ink pen Small squeeze bottle 48 Murray sugar-free chocolate bites cookies 48 large dark chocolate chips
While cake balls chill in the refrigerator, melt white candy coating in a microwave-safe bowl on medium power for 30 seconds at a time, stirring with a spoon in between. Coating should be about 3 inches deep for easy dipping. A double boiler works as well. When ready to dip, remove a few cake balls at a time from the refrigerator, keeping the rest chilled. One at a time, dip about 1/2 inch of the tip of a lollipop stick into melted candy coating, and insert stick straight into the bottom of a snowman, pushing no more than halfway through. Dip cake pop into melted coating and tap off excess by holding pop over bowl in one hand and tapping wrist gently with other hand. Rotate stick so coating doesn’t build up on one side. While coating is still wet, attach a sunflower seed in position for a nose and 2 chocolate jimmies in position for arms. Hold each in place for a few seconds until coating sets, and place in Styrofoam block to dry. Repeat until all snowmen have noses and arms.
When pops are dry, use a toothpick to dot a small amount of melted candy coating in position for buttons, and attach 3 blue confetti sprinkles to each snowman. Draw on eyes and smiles with an edible-ink pen and let dry completely in the Styrofoam block. Pour remaining melted coating into small squeeze bottle. Squeeze a small amount onto the top of a snowman’s head. Attach 1 chocolate cookie. Squeeze another small amount of coating in the center opening of the cookie. Push 1 chocolate chip, pointed side down, into the center. The melted candy coating will be forced up the side, creating a white rim for the hat. Place in the Styrofoam block to dry completely.
Images and text copyright Angie Dudley.
Tasty Tip: If snowmen aren’t the right style, some adorable alternatives would be to paint those pops like peppermints. Rolling them in coarse sugar or rock candy would create bite-size snowballs, or for the naughty snackers, dress up some cake pops like lumps of coal.


