
Feeling threatened by out-of-date, space-hogging furniture? Instead of donating that old piece or dropping it by the side of the road, take another look and consider refinishing or completely repurposing it. Turn that dresser into a laundry station, old chairs into photo frames and dresser drawers into a shelving system. There’s an attractive and practical way to transform almost any piece, and we’ve got the strategies you need to face your furniture and win.
Upcycled, Repurposed & Redone
Ready to turn those old, unwanted items into fresh, useful pieces? These projects are as inspiring as they are doable and might be just what you need to jumpstart your repurposing projects.
Bookshelf Refresh
Give the ol’ bookshelf a fresh start by turning it into a hidden storage compartment, sandbox, garden or bar.
For extra storage space, freshen up the piece with a new coat of paint and add casters to the back of the shelf. Lay the shelf down on its back so it rests on the casters, attach drawer pulls to the front side and roll it under your bed. Leave the shelves in so that you can organize items in different sections.
Or, you can make a sandbox for the kids. Paint the bookcase in bright colors, seal it with waterproof sealer and lay it face up on the back porch or under an awning or overhang. Take out a shelf or two in the middle so there’s a large section to fill with sand. Store shovels, tools and toys in the sections on both sides, and it’s ready to use. Got a green thumb? Do all the same steps, switching the sand for soil and seeds to make your own garden plot.
Maybe you’re a wine connoisseur who would enjoy a beautiful bar. Take one shelf out, and replace it with a wine glass rack. Then, make the inside pop with patterned wallpaper or a different color paint on the back wall. Add a wine cooler, decor and wine bottles to complete the ensemble.
Transform Chairs
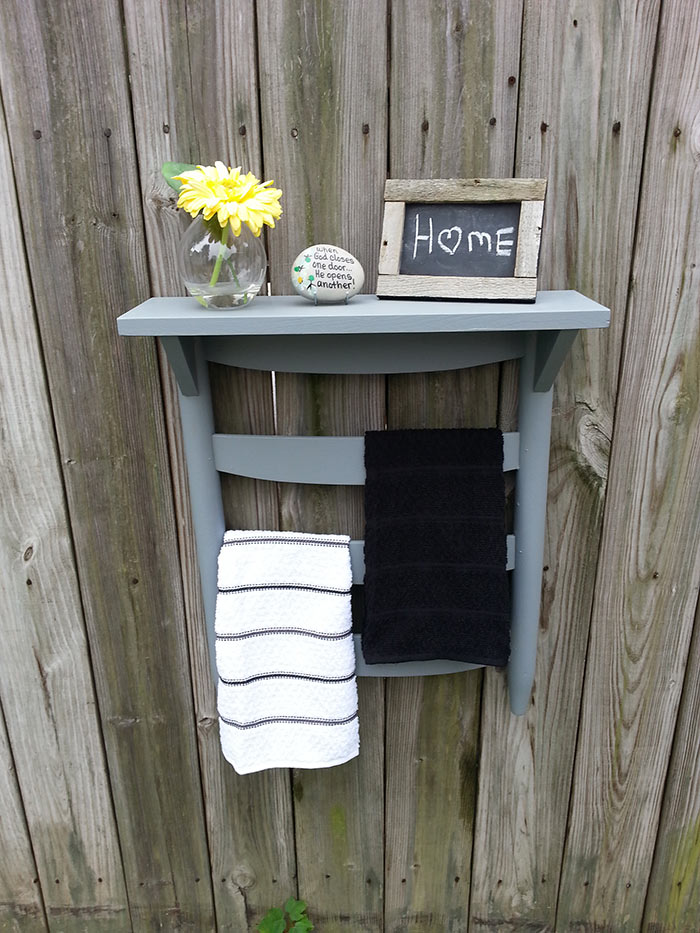
Depending on the type of backs your chairs have, you could turn them into towel racks or photo frames. Gail Wilson of myrepurposedlife.com shows you how to turn chair backs that have slats into towel racks:
Cut off the back of the chair (with a miter or jigsaw cutters) so it’s even with the last slat of the chair back.
Turn it upside down so the cut sides are facing up and the chair back is curved out toward you.
Cut a piece of 1×3-inch wood to the size you’d like for a shelf, and use Gorilla Glue to attach it to the top of the chair back.
Pre-drill holes, and drill two screws through the shelf into the chair back.
Cut two 45-degree triangles out of the 1×3-inch wood to support each side of the shelf.
Drill screws through the chair back and the top of the shelf into each triangle support wedge.
Paint the whole thing, and hang it up on the wall. This rustic twist on a towel rack works double time, giving towels or kitchen tools the perfect spot to hang and adding to the room’s overall decor.
If your old chairs have backs in the shape of a frame with basket weave or something other than wood slats in the middle, you can turn them into photo frames. Here’s how Brooke Ulrich from allthingsthrifty.com did it:
Cut the chair backs off, and remove the basket weave with a razor blade knife. Sand away any remaining bits of weave from the inside edges of the frame.
Paint the frames, print your photos and tape them to the back of the frames.
You’re all set; go make a pretty gallery wall.
Dresser Do-Over
Completely revamp an old dresser and its drawers with two different projects.
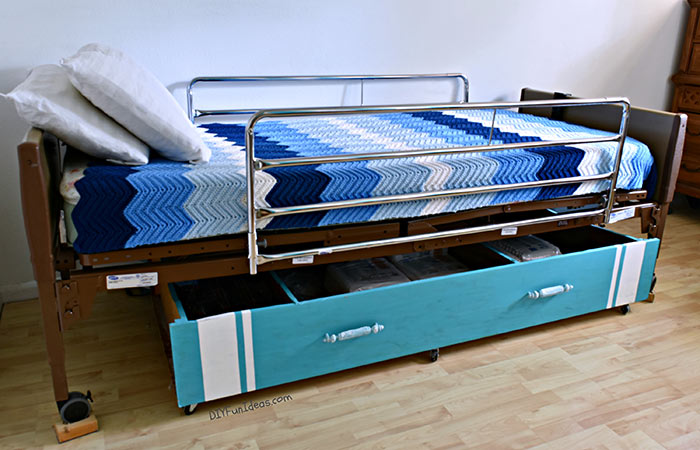
First, let’s repurpose the drawers. Take them out, (remove the knobs if desired) paint the drawers and attach a contrasting pattern of wallpaper to the bottom of the drawers. Then stack them vertically on their sides against a wall (or screw them into the wall) to create your own set of eclectic bookshelves.
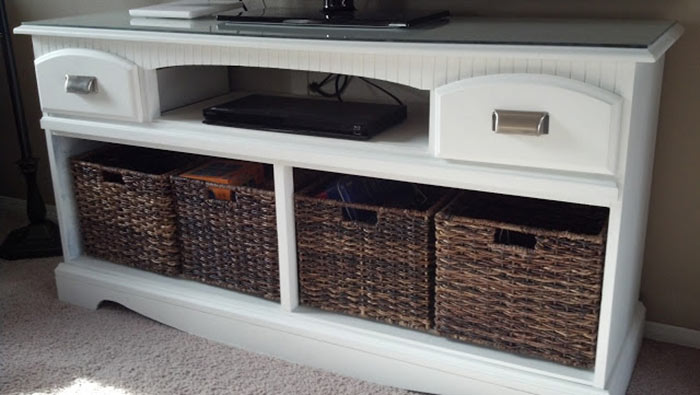
Now for the dresser. Paint or refinish it to match the style of your home. Place baskets or bins where a few of the drawers used to be and use them to store toys, towels or other items. Leave the rest of the drawer slots empty for open storage or display areas. Think: laundry station, linen closet replacement or playroom storage.
You could also turn the dresser into an entertainment center. You’ll just need to drill a hole or two in the back of the piece to feed cords through. The best part? You’ll finally have enough room for your gaming systems, DVR and Internet router, cords included.
Armoire Overhaul
Not sure what to do with an old armoire? Don’t worry, we’ve got a few ideas to help you upcycle this monster.
First, update it with paint, wood stain or a distressing agent, if needed. Then, turn it into a master storage unit for your biggest storage need or hobby. It could be a gardening, laundry, sewing or craft station. Add a computer and a chair to make it a desk. Or, if you need more room for nonperishables, turn the armoire into a pantry. Expecting? Add a changing pad, storage baskets, diapers and wipes for a complete baby changing station. The cabinet doors are a big plus—whatever you turn your armoire into, you can easily shut those doors to keep everything out of sight. Hiding a mess doesn’t get much easier than that.
Refinishing Techniques
Not sure how to strip and refinish your furniture? We lay it all out for you with the help of a few crafty bloggers.
Strip Wood Furniture
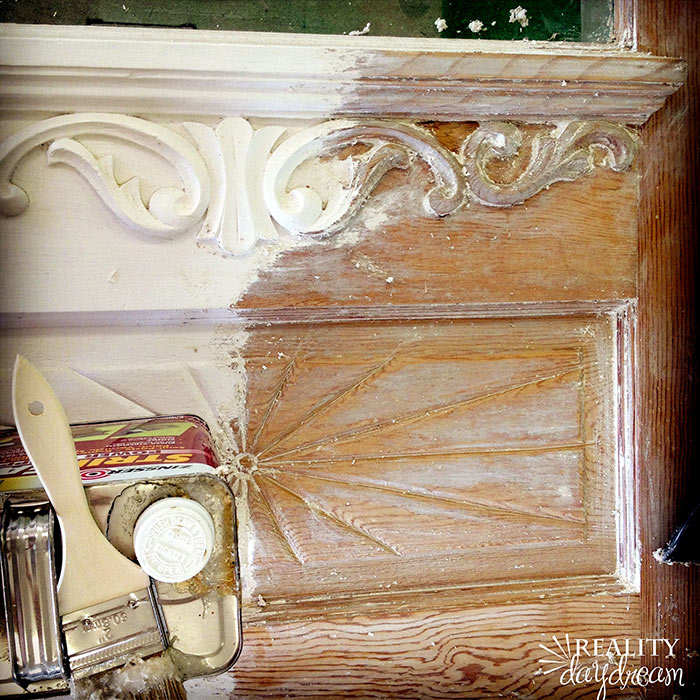
This tutorial by bloggers Beth and Nick Sywassink from realitydaydream.com will help you learn how to strip off old paint or stained finishes from wood furniture.
Step 1: You’ll need a tough scraper, wire brush, stripper and either a sander or sandpaper at 120 and 220 grit. Beth and Nick recommend using Zinsser PowerStrip to make stripping your furniture that much easier.
Step 2:Wear goggles or safety glasses and a pair of gloves. Spread the stripper onto your furniture with a paint brush. Start in sections, and the paint/finish will begin to bubble up.
Step 3:Wait two to three minutes, and then scrape away the paint/finish. Keep a bucket handy to discard the scrapings.
Step 4:Once you’ve scraped the whole piece, spread on more stripper. This time, use your wire brush to scrub away any leftovers.
Step 5:Scrape it all one more time with the scraper. If there are details on the piece, use Zinsser Detail Stripper on those areas. Let it sit and soak into the hard-to-reach areas, and then use the wire brush to scrub away what you can. A flat head screwdriver may help you take on super tiny details.
Step 6: Wipe up excess scrapings with a rag, and sand your furniture down starting with sandpaper that’s 120 grit. Work your way up to paper that’s 220 grit.
Step 7: You’re ready to add a new stain or a fresh coat of paint.
Age & Distress
W
hether you’re a Fixer Upper fan and Joanna Gaines is your hero or just love the shabby chic and distressed look that’s so popular right now, we’ve brought in Angela Lerew from unexpectedelegance.com to share seven ways to add age and character to your furniture.
1.Remove bits of paint:If you have a piece that’s been painted over multiple times, you have lots of layers to work with. Cover the piece with paint stripper, wait a few minutes and then start scraping off small bits of paint. Scrape off paint until you get the look you want.
2. Brush it:Work a dry-bristle brush with just a bit of white paint (or another color) lightly over a newly painted piece of furniture to add age and character.
3. Sand it:Aim for edges, handles and corners to give the piece a worn look.
4. Vaseline: Paint won’t stick to Vaseline, so spread Vaseline where you want your furniture to look worn. Then, paint over the entire piece, and lightly sand over the areas covered in Vaseline to carefully wipe it away. You could also use sandpaper along the edges or corners to gently give your piece an aged look.
5. Antique wax or glaze: Add wax or glaze over paint to distress specific areas. Wipe most of it off to leave only a bit of the color behind. Just make sure to work quickly!
6. Chalk paint: There’s no need to prime or sand before brushing on chalk paint. It leaves a matte finish, and the more you use the better it looks. Just be sure to seal it with a coat of wax.
7. Milk paint:It comes in powder form, so you just need to add water to turn it into paint. Use it to give any piece an authentic or old vibe. It may take a little getting used to, but missmustardseed.com has everything you need to get started.
Scuffs & Scrapes
U
se these handy tricks to disguise dings and scratches in your wood furniture.
Color in blemishes with Sharpie’s wood touch-up markers. Start with a light marker and build up to a darker one to get the right hue.
Rubbing a shelled walnut over scratches will darken them and make them disappear.
Nut allergy? Buff out scrapes with used coffee grounds on a cotton swab.
Sources and photo credits: apartmenttherapy.com, unexpectedelegance.com, realitydaydream.com, decoist.com, wimp.com, explosion.com, homedit.com, allthingsthrifty.com, myrepurposedlife.com, diyfunideas.com, attheparks.blogspot.com, sincerelysarad.com