

7 How Tos For Kitchen Success
The month of December is one of the most important months for food in the year. Perhaps it’s the cooler weather or longer hours of darkness, but people seem to spend more time preparing and eating food this month than any other. And while we all like to envision ourselves as being masters of our kitchens, sometimes, the easiest culinary techniques leave us scratching our heads. (I don’t know about you, but my homemade desserts look nothing like Martha Stewart’s.) So, to ease your worries, we’ve compiled a list of seven how tos in the kitchen for you to utilize this month that will impress your dinner guests—and maybe even yourself.
Hard-Boil The Incredible Edible Egg
Ever wonder how someone can hard-boil an egg to such perfection that the yolk is at the perfect golden consistency and the shell seemingly falls off the tender whites? While hard-boiling an egg isn’t rocket science, there are a few tricks that can elevate your techniques to egg-cellent standards!
Don’t Get Cracked
Cold eggs are more likely to crack than eggs that begin at room temperature. Either let your eggs stand at room temperature for 20 to 30 minutes or run them under warm (not hot) tap water until their temperatures drops.
Keep ’Em Covered
In a large pot, lay the eggs in a single layer and cover with just enough cold water to completely cover the tops of the eggs. Too much water and it will take too long to boil and can result in overcooked eggs; too little water and parts of the eggs will not be thoroughly cooked. About 1 inch of water covering them is sufficient.
Bring On The Boil
Place the pot over high heat until the water hits a rapid boil. Immediately cover the eggs and remove from heat. Let the eggs cook for 17 to 20 minutes (depending on size) before dumping out the cooking water.
Achieve The Perfect Peel
Once you’ve drained the eggs, quickly run them under cold water. The cold water bath creates a steam between the egg and the shell, which allows it to simply slide off once cracked.
Source: whatscookingamerica.net

Get a Squeaky-Clean Glass Top Stove
No one’s perfect, and sometimes, you turn your head for a split second or get sidetracked doing something else and before you know it your sauce, soup or water is boiling over the side of the pot, instantaneously adhering itself to your pristine glass-top stove. Fear not! Though some elbow grease is required, you can have your stove top squeaky clean in no time.
1. Let the stove cool before trying to clean it. You’ll only risk burning yourself.
2. Scrape any burnt food off with a spoon or dull knife. For particularly stubborn substances, dab on some olive oil to help lubricate the area for easier removal.
3. Mix a combination of baking soda, water and lemon together until a paste forms.
4. Spread the mixture over the stained area and allow it to sit for 10 minutes before gently scrubbing the area with a soft cloth. Don’t use abrasive scrubbers; they will only scratch your glass surface.
5. Repeat until the stain is completely removed.
Source: howtocleanstuff.net
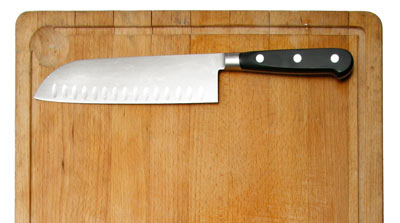
Slice ‘N’ Dice Like A Pro
Ever watch the likes of Rachel Ray or Gordon Ramsey seemingly glide their blade across a vast array of veggies and before your eyes where once a carrot sat now sits a pile of perfectly shaped carrot cubes? Well, we don’t recommend trying that at home, but there are a few tweaks you can make to your veggie dicing technique that will have you slicing and dicing like a pro in no time!
Choose Wisely
The right knife makes all the difference. Select a knife that is comfortable in your hand. It shouldn’t tip forward or feel heavy in the handle.
Size Matters
The most common sizes are 6-, 8- and 10-inch blades. Six inches may be too small for some jobs, while the 10-inch may be too difficult for a novice to use. If you’re just starting out, stick with the 8-inch.
Don’t Dull Down
Dulled blades can easily slip, resulting in a quick cut to your finger before you even realized what happened. Keep your blades sharp and stored in a knife block, and replace the knife if you notice any chips or damage to the blade.
Perfect Your Grip
The proper way to hold the knife is at the base of the handle with your thumb on one side and your index finger slightly bent on the other side. This gives you the most control.
Let Your Knuckles be Your Guide
Steady the veggie with your free hand with your knuckles facing up and your fingers curled under. Allow your knuckles to help guide the knife, and be sure to move your hand back as you chop.
Slow and Steady Wins the Race
Professional chefs slice and dice in seconds, but most amateur cooks will never reach that skill level. Instead of focusing on how quickly you can work, focus instead on your quality and technique. Your fingers will thank you in the end!
Source: sheknows.com
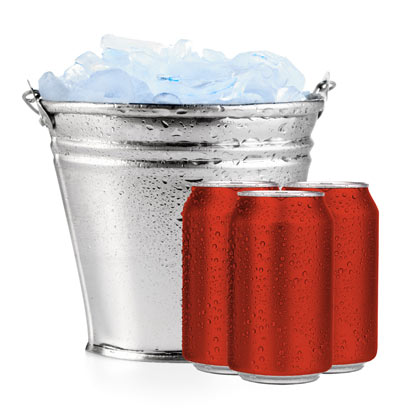
Cool Down Your Coke In Less Than Two Minutes
When unexpected guests drop in or you completely forgot to put the sodas in the fridge before your big party, this little technique is a real lifesaver and keeps your guests from drinking their colas at room temperature.
1. Fill a large bowl or tub with just enough water to cover the sodas you need to chill.
2. Add in enough ice to evenly disperse throughout the bowl or tub but not so much that the beverages won’t be fully submerged in water.
3. Add in table salt. About a handful or 1/2 cup should suffice; less if you’re using a smaller mixing bowl.
4. Give the mixture a good stir and submerge the cans. The salt lowers the freezing temperature of the water making the mixture more efficient at cooling.
5. Once the cans are all covered, gently stir the water around them for two minutes.
6. Remove, rinse and enjoy!
Source: sheknows.com
Rock Your Risotto
This classic Italian dish can glam up any dinner party spread. And though it consists of just a few ingredients, the rice dish gets a bad rap as being “complicated” to prepare. But don’t be intimidated into sticking with a bland pilaf. A few simple tips can have you serving up a rocking risotto dish that trumps all others.
What You’ll Need:
1 cup arborio rice
4 cups chicken stock
3 tbsp unsalted butter
1/4 cup grated cheese (your choice)
1/2 cup finely chopped onion
(Tip: For every 1 cup of rice, you’ll need 4 cups of broth.)
Method:
Risotto is prepared by slowly simmering rice in just enough broth to allow for absorption. As the broth is absorbed by the rice, you’ll slowly add more until the rice is fully cooked.
1. Heat up, but do not boil, your stock in a large soup pot.
2. In a separate sauté pan, slowly heat the onion and 1 tbsp unsalted butter over low heat until the onion appears translucent but not brown.
3. Add in your rice and allow the butter to coat the grains.
4. Using a ladle, add one ladle-full of stock to the rice and gently stir the rice as it absorbs the liquid. (Tip: Keep the heat set so that the stock bubbles but doesn’t boil.)
5. As the stock is absorbed, add another ladle-full of stock and continue to gently stir the mixture. Remember to scrape the sides and keep the rice moving so that it cooks consistently.
6. Repeat until the stock is absorbed or the rice appears fully cooked. (Tip: As the rice cooks, it releases its starch and the mixture will take on a more creamy consistency.)
7. Once the rice is fully cooked, add in the remaining butter and cheese and stir consistently until it is evenly dispersed.
8. Serve and enjoy! (Tip: Once your risotto is done, it is important to serve immediately. Let it sit for too long and it takes on a gluey consistency.)
Source: bonappetit.com
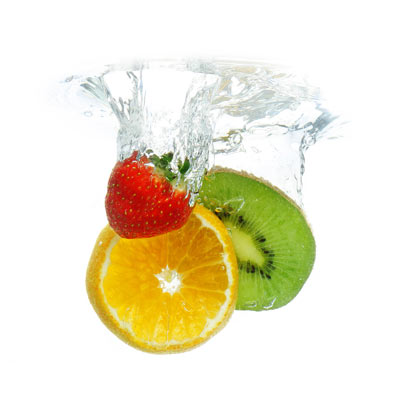
Add wow to your water
Not a fan of boring old water? If you’re not getting in the recommended eight to 10 glasses of water each day, maybe that’s because your water needs a flavor boost. With the summer heat quickly approaching, follow these simple steps to fall in love with your water and stay hydrated.
What you’ll need:
a pitcher
a knife
Cold bottled or filtered water
a variety of sliced fruits and vegetables
STEPS:
1. Find The Perfect Pitchers
Have a handful of quality pitchers on hand, allowing you to make and store more than one flavor of water. You never know whether you’ll be in a cucumber or strawberry mood!
2. It’s All About The Agua
The art of infusion is all about starting with the cleanest, best-tasting water possible. If your tap water doesn’t do it for ya, use bottled or filtered water. Start with cold water.
3. Flavor, Flavor, Flavor
Go crazy here. The options are really only as limited as your imagination. Slice up your selection (how about lemon-lime, cucumber, strawberry-orange, etc.). Use roughly one whole fruit or veggie per pitcher.
4. Infusion At Its Finest
Believe it or not, water absorbs the flavoring of fruits and veggies pretty quickly. Let your mixture sit in the fridge for a minimum of 10 minutes—a bit longer for a stronger flavor. Next? Pour yourself a tall glass of homemade flavored H2O and enjoy!
What You’ll Need:
4 egg whites
4 egg yolks
1 tbsp vanilla
1 tsp cinnamon
1 tsp allspice
1/4 cup sugar
1 cup heavy cream
1 cup milk
Pinch of nutmeg
Alcohol of choice (bourbon, rum, whiskey, etc.)
Steps:
1. Using a hand blender, gently whip the egg whites in a small bowl for one to two minutes.
2. In a separate bowl, combine the egg yolks, sugar, vanilla, all spice nutmeg and cinnamon. Use the hand blender to mix everything together.
3. Add the milk and the cream, and continue to blend until all of the ingredients seem evenly distributed. (Tip: If you’re looking to cut back on the calories, use low-fat or skim milk instead of whole.)
4. Add the egg yolks to the mixture slowly and work them in gently. The whipped yolks give this drink its distinctive airy texture.
5. If you choose to add alcohol, any will do, however bourbon, rum and whiskey are some of the most common.
6. Chill and serve.
Source: kitchendaily.com

Ice Your Way to an Elegant Cake
The difference between a good cake and a great cake is the presentation. Slather and smear on globs of icing and your decadent delicious dessert loses its appeal in a matter of seconds. But that doesn’t mean you should run to the nearest bakery the next time you’re hosting a dinner party. Follow these simple steps for icing a cake and you’ll be among the ranks of a top pastry chef… at least from an appearance standpoint!
Rule No. 1: Keep it Cool
In your exuberance to start slathering on icing, don’t make the mistake of trying to ice a cake before it cools down. Ice it too early and your thick, rich icing will more resemble icing soup.
Rule No. 2: Banish the Butter Knife
If you really want to look like an amateur cook, then by all means bust out the butter knife. You wouldn’t use a screw driver to hammer a nail, so don’t use a butter knife in place of the proper icing tool. Invest in an icing spatula to create that smooth and even distribution.
Rule No. 3: A Dollop’ll Do Ya
Apply your icing in large dollops on the cake surface. Push, don’t drag, your spatula through the frosting in short side-to-side motions. If you attempt to drag the frosting, you’ll be more likely to break into the cake surface.
Rule No. 4: Stay on Top
Don’t try to run the spatula from the top of the cake down the sides and up again all in one motion. The distribution won’t be even, and you risk breaking into the cake. Instead, work with the top of the cake and the sides of the cake separately. You can work in sections and go back to add more icing as needed.
(Tip: For a glossier finish, heat the spatula and run ever so quickly along the completed iced cake. A butter-based icing will melt just a touch to create a smoother finished product.)
Source: sweets.seriouseats.com