
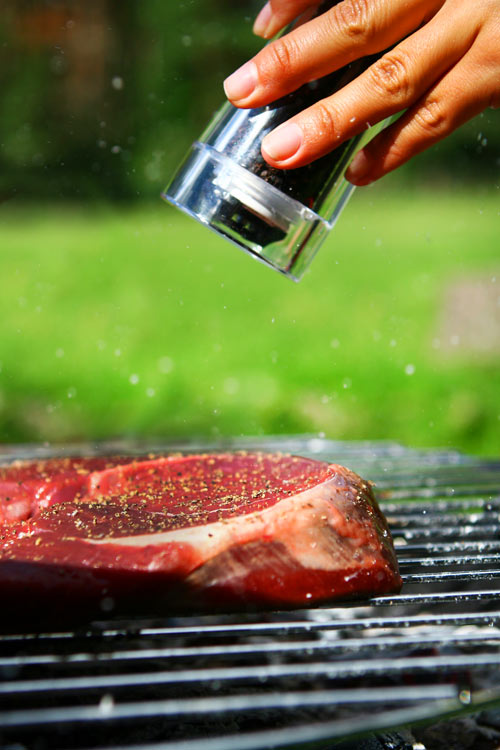
In many parts of the country, summer is known as grilling season. In North Central Florida, we’re lucky enough to be able to cook outdoors virtually year-round, but there’s still nothing that says “summer” like the aroma of steaks sizzling over an open flame on a soft June evening.
If you think the grill is just for steaks and burgers, however, think again. Almost anything that can be cooked in your oven can also be cooked outside over an open flame.
“Think outside the box as far as food goes,” advises Chef Greg Mullen of Artisinal Dish. “You can do pizzas on the grill easily and also grill fruits and veggies. It’s a lot of fun to create a menu that has all the items—start to finish—cooked on the grill.”
Ready for your own grilling adventure? Read on and discover great grilling tips, ideas and handy hints to get you started. Your outdoor cooking skills are about to step up a notch or two!
Outdoor Cooking Defined
People generally lump it all together, but there’s a difference between grilling, barbecuing and smoking, although all three overlap somewhat,” says Chef Mullen.
Grilling Cooking food (generally a protein or vegetable) over an open flame.
Smoking Cooking food over lower heat for a longer time, allowing the smoke to permeate the food, adding additional flavor.
Barbequing Cooking food over coals, gas or wood heat with the addition of sauces and marinades for extra flavor.
Methods of Cooking
Direct: With this method, there’s a heat source directly under the food. Use direct cooking to sear meats, make grill marks and add flavor. Ideal for foods that cook thoroughly in less than 25 minutes, including steaks, pieces of chicken, pork chops, kabobs, sausages and vegetables.
Indirect: There’s no heat source right below the food, and this method is more like roasting in an oven. Of course, you also get that incredible grilled flavor. Indirect cooking is best for foods that take longer than 25 minutes to cook, such as whole chickens and larger cuts of meat, and delicate items, such as seafood, which might dry out when cooking with direct heat.
The indirect-cooking method is primarily used at Ipanema Brazilian Steakhouse in Ocala, notes Mike Lenhart, a manager at Ipanema.
“We use hickory wood charcoal because it gives a nice smoky flavor,” says Lenhart. “We use large, (7- to 10-pound cuts for our bottom sirloin, filet mignon and prime rib. We’ll put the meat closer to the fire to start and then pull it back while it’s cooking so it doesn’t get too done on the outside. Because a grill has different hot spots, the best way to cook meat evenly is to start cooking with the meat on a diagonal and then quarter-turn it the opposite way. When you flip it, the other side of the meat is getting the hotter spot. Our grill is rotisserie style. When we put a skewer of meat on the grill, it starts off rare and we take slices off as it cooks depending on how people order.”
Gas or Charcoal?
“There are two main reasons—flavor and convenience—why people prefer either a charcoal or gas grill,” says Jeanine Thompson of Weber-Stephen Products LLC (Weber grills). “The first is that there is a distinct difference in flavor. A gas grill creates smoke that comes from the juices and fat drippings which fall onto the Flavorizer bars, or heat source, creating more of a meaty flavor. A gas grill provides more convenience, which is a plus.”
“If you are grilling on a charcoal grill, the charcoal briquettes contribute a woodsy smoke flavor,” Thompson adds. “Charcoal lovers like the idea of not only grilling the food but also tending a fire.”
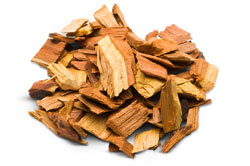 Which Wood For Which Food?
Wood imparts a unique flavor to food cooked over it, so deciding which wood to use is really deciding what flavor you want.
“There’s no right or wrong,” says Chef Mullen. “If you want salmon cooked over mesquite, that’s fine. It’s all personal preference.”
A good piece of meat, such as a quality tenderloin, can stand up to stronger flavors (think hickory or mesquite), but you might not want a strong flavor when cooking more “delicate” items, such as seafood. Apple, cherry, alder or cedar all have milder flavors. To use flavored wood chips with a gas grill, either place the chips in a smoker box or in wrapped tin foil with plenty of holes punched into it. For a charcoal grill, place the wood chips either in a smoker box or directly on top of the charcoal briquettes once they are thoroughly heated.
Hickory-Strong, smoky flavor
Mesquite-Unique to the Southwest, distinctive flavor
Cherry-Rich, “bright,” slightly sweet
Maple-Mild, sweet
Alder-Mellow, mild flavor
Apple-Mild, slightly sweet
Cedar-Aromatic, mellow
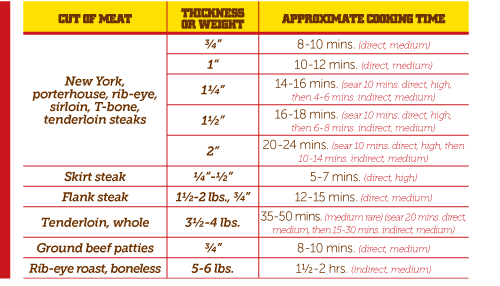
Grilling Tips for Beef, Poultry & Seafood
Basic guidelines go a long way, but they aren’t written in stone. Keep in mind that cooking time is influenced by outside temperatures and individual preference.
By following the steps outlined in the general ‘Grilling Guidelines’ found on weber.com, a beginner griller can grill the perfect food,” says Thompson.
Beef
Grill patties and steaks 1-inch thick or less using the direct method for the time given on the chart or to desired doneness, turning once halfway through grilling time. Sear thick steaks over direct, high heat and finish grilling over indirect, medium heat turning once halfway through grilling time. Grill roasts and thicker cuts using the indirect method for the time given on the chart or until an instant-read thermometer registers the desired internal temperature. In the chart, cooking times for beef are to medium doneness unless otherwise noted. Let roasts, larger cuts of meat and thick steaks rest 10 to 15 minutes before carving. The internal temperature of the meat will rise by 5 to 10 degrees during this time.
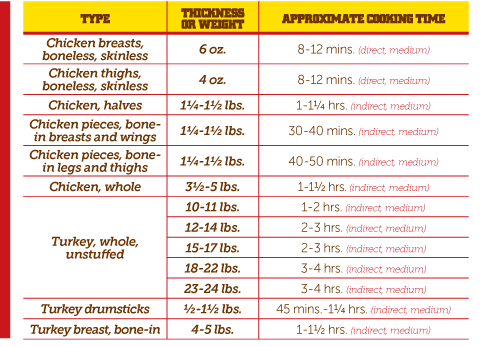
Chicken & Turkey
Grill boneless chicken pieces using the direct method for the time given on the chart or to desired doneness, turning once halfway through grilling time. Grill whole poultry using the indirect method for the time given on the chart or until an instant-read thermometer registers the desired internal temperature. Let larger cuts of meat rest 10 to 15 minutes before carving.
Fish
As a general rule, when grilling fish allow four to five minutes per 1/2-inch thickness and eight to 10 minutes per 1-inch thickness. Grill fish fillets using the direct method for the time given on the chart or to desired doneness, turning once halfway through grilling time. Grill whole fish using the indirect method for the time given on the chart or until an instant-read thermometer registers the desired internal temperature.

Our thanks to Weber-Stephen Products LLC for allowing us to use copyrighted information from their Grilling Guides on weber.com. Used with permission.
Savor The Season
Beef:
Season with Brazilian rock salt and pepper before cooking. You can’t eat the rock salt, so brush it off before serving, but it will add flavor to the meat while cooking.
Blend garlic cloves and olive oil in the food processor. Then, brush the mixture on the steak while cooking.
Chicken:
Wrap in bacon or pancetta.
Marinate in a mixture of white wine, water and fresh herbs, such as thyme, oregano and parsley.
Pork:
Season with salt, pepper and herbs to taste.
Marinate for 30 minutes in mixture of three parts soy sauce, one part brown sugar and one part cracked black pepper.
Season with salt, lemon pepper seasoning and dried whole oregano.
Lamb:
Marinate in a mixture of white wine, olive oil and chopped fresh mint leaves. Other herbs can be added to taste, if desired.
Brush with olive oil; sprinkle with rosemary, salt and fresh ground black pepper to taste.
Sources: Artisinal Dish, Ipanema Brazilian Steakhouse and cooks.com
Great Grilling Secrets

Go easy on marinating times. For most meats, 30 minutes to a couple hours is best.Delicate meats, such as seafood, typically require the shortest marinating time. Marinades break down the protein in the meat, making it more tender, but if you leave meat in a marinade too long, the enzymes—especially from certain fruit juices—will change the texture of the meat and can make it mushy or tough.
After taking meat out of the marinade, pat it dry before grilling. That’s the secret to a delicious crusty outside.
When grilling kabobs, don’t cram the meat and veggies together on the skewer. They should be touching, but just barely.
Oil the food, not the grill! Food can still stick to the grate if you just spray the metal with oil, so put oil on the food itself.
When cooking veggies on the grill, simplify the process by using a grilling basket or skillet. Brush a light coating of olive oil on the veggies so they don’t stick.
Don’t be in a hurry! Pressing and poking meat while it cooks doesn’t necessarily make it cook faster and allows juices to escape.
You’ll get better flavor if you just let the meat cook and only turn it once or twice rather than turning it over and over.
If dripping fat causes a flare-up while you’re cooking, lower the grill lid for a moment rather than spraying water on the flames, which can splatter the juices and fat.
Once the meat is done, let it rest, uncovered, a few minutes before serving. This gives the natural juices a chance to settle back into the meat.
Covering cooked meat can make it soggy and soften the crusty outside. If you’re worried about bugs, use a mesh topper that will let air circulate, but don’t cover with a solid lid.
Sources: Jamie Purviance, grilling pro and author of Weber’s Way to Grill: The Step-by-Step Guide to Expert Grilling, Chef Greg Mullen of Artisinal Dish, Ipanema Brazilian Steakhouse and grillingtips.com
Get ‘er Done
You can’t judge a book, er, make that a steak, by its cover! The only way to be certain meat is properly cooked is to use a thermometer.
“An instant-read thermometer is necessary for quickly gauging the internal temperature of meat when grilling,” says Jeanine Thompson. “For the most accurate read, insert the thermometer into the thickest part of the cut and avoid touching any bone.” “A thermometer is indispensable, especially if you’re grilling expensive cuts of meat. You can ruin a piece of meat by overcooking it,” notes Chef Greg Mullen. “No matter how it looks on the outside, the inside is another story. Checking the internal temperature is the only way to tell if it’s really done.”
USDA Recommended Safe Minimum Internal Temperatures:
Steaks & Roasts: 145°F
Fish: 145°F
Pork: 160°F
Ground Beef: 160°F
Chicken Breasts: 165°F
Whole Poultry: 165°F
Source: fsis.usda.gov
Grilling Gadgets You Gotta Have
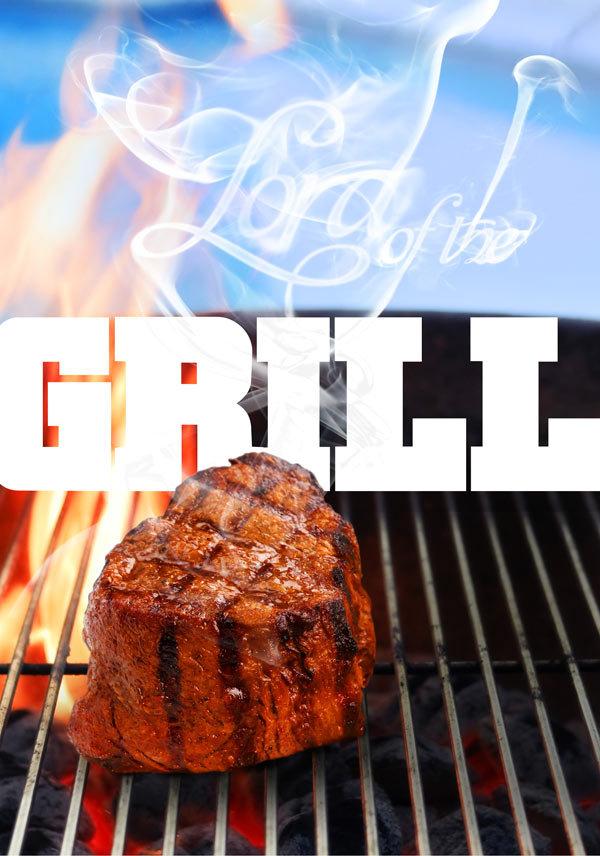
You’re going to need more than just your grill and a flame to get the job done perfectly. These handy tools will make you the Lord of the Grill.
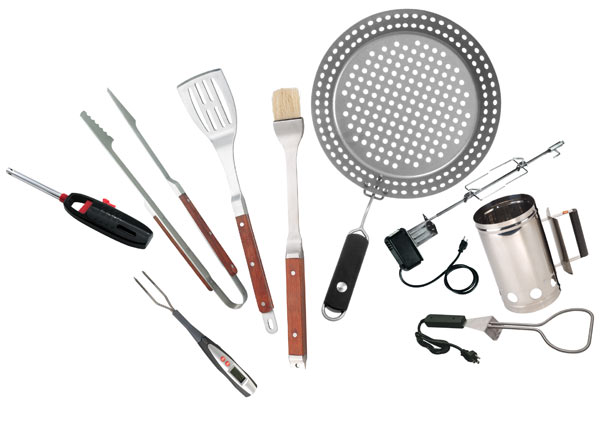
Long-handled Lighter: Light your fire without toasting your fingers.
Long-handled Tongs: Turn food without getting close to the flame.
Long-handled Spatula: Flip burgers and meat while cooking.
Basting Brush: A basting brush makes it simple to baste meats while cooking. Silicone brushes are ideal, as they won’t absorb flavors and are easy to clean.
Meat Thermometer: Make sure meats are properly cooked.
Grilling Mitt: Protect your hands and lower arms with a grilling mitt. Some new models are made of silicone.
Skewers/Skewer Holder: Even if you don’t get the skewer holder, which holds skewers in place over the grate for cooking, you’ll definitely want the skewers. You can use metal or bamboo; just remember to soak wooden skewers for about 30 minutes in water so they don’t catch on fire while you’re cooking.
Wire Grilling Basket: Ideal for cooking fish, vegetables and smaller cuts of meat, a grilling basket keeps food from falling through the grate and allow you to turn it easily during cooking.
Grill Skillet: Made of open mesh or non-stick metal with holes, these skillets come in different sizes and shapes and allow heat to penetrate easily and cook food without worrying about it falling through the rack. They are great for roasting veggies.
Roasting Rack:These are helpful if you’re cooking a whole turkey, chicken or other large portion of meat. Place it right over the grate while grilling. These racks make it easy to rotate meat and remove it from the grill, as well.
Rotisserie: Add a motorized rotisserie to help meat cook consistently inside the closed grill.
Chimney Starter: Place charcoal in this hollow, upright cylinder and newspaper in the bottom section. After you light the paper, you’ll have evenly lit charcoal ready to cook on in 15 to 30 minutes.
Electric Starter: Gets your charcoal grill fired up and ready to use quickly. Place this metal starter attached to a heavy-duty extension cord in the center pile of charcoal. Plug it in, and within 10 to 15 minutes, your coals will be red hot and ready to cook over. (And yes, you remove the electric starter before cooking!)
Clean Up Your Act!
Before you grill, burn off any residue on the grates by heating the grill and brushing the grates with a stiff wire brush. A more thorough cleaning is needed at least once a year and more often if you use your grill frequently.
To get your gas grill really clean, you’ll need a stainless steel grill brush, fine steel wool pads, mild dish soap, sponge or dishcloth, and a 1-inch plastic putty knife. When the gas has been turned off and the grill is cold:
1. Clear the burner tubes of any blockages. To clean tubes, brush the portholes with a stainless steel wire brush in an up-and-down motion. Do not brush lengthwise across the ports, as this will only push debris from one hole to another.
2. Clean the flavorizer bars. Turn grill on high, and allow the residue to burn off. Occasionally brush the bars with a grill brush or scrape with a putty knife. After the grill has cooled, wipe with a rag and warm soapy water.
3. Clean the warming rackswith a soapy, fine steel wool pad to keep them and the grill baskets clean and free of smoke stains and debris. Rub the racks gently and then rinse thoroughly.
4. Carefully scrape the inside of the grill with a putty knife, and push the residue through the bottom hole. Remove the cool bottom tray from under the grill, and place it over a trash can. To deep clean the tray, use warm, soapy water and a fine steel wool pad. Check the catch pan liner monthly and replace when needed.
5. Clean grease drippings on exterior surfaces by using mild, soapy water. Never use an abrasive, lemon-based or oven cleaner, as it can scratch the stainless steel or remove the paint finish. If you have a stainless steel finish, use an environmentally friendly stainless-steel cleaner and a soft cloth to give it a nice shine and remove fingerprints. For porcelain enamel, use a cloth and warm soapy water.
Note: While cleaning, take stock of any rusted or corroded pieces. Check all gas fittings and hoses for leaks and replace if needed. Call the manufacturer’s customer service line to order and assemble new parts. Extend the life of your grill by protecting it from the elements with a durable, weather resistant cover.
Source: © Weber-Stephen Products LLC. Used with permission.