

It started when I was in my early teens. A woman who worked for my father brought us a huge container of home-baked cookies. My 14-year-old self was impressed. I can do that, I thought.
And so, the next December, I scoured my mother’s cookbooks, picked out a number of recipes and started my mission. The two long days spent mixing, rolling, cutting out, baking and decorating were all worth it when I arranged the fruits of my labor on plates to deliver to friends and neighbors.
I was hooked. Over the decades following that first year of inspiration, I continued my baking campaign. Then one year, I was invited to a cookie exchange party. For a baker (and someone who loves to eat!), this sounded like my kind of party. Turns out, I’m not alone.
Cookie parties actually began in America in the late 1800s. They were known as “cookie exchanges” by the 1930s and “cookie swaps” by the 1950s.
“The 1950s were the highlight of the cookie exchange in this country. They lost popularity in the ‘60s and ‘70s, but there’s definitely been a resurgence,” says author Robin Olson of Gaithersburg, Maryland, who has written the book on how to host a cookie exchange.
In 2008, Robin was mentioned in a baking article in the New York Times. Not one but three offers to write a book followed that article. The Cookie Party Cookbook: The Ultimate Guide to Hosting a Cookie Exchange was published by St. Martin’s Press in 2010. The book includes many beloved cookie recipes, both from Robin’s own parties and “cookie exchange fans” from around the world.
Robin launched her website, robinsweb.com, in 1997, and the site consistently gets some 1.5 million visitors per year. In 2007, her main website had grown so large that she moved all the cookie exchange content over to cookie-exchange.com. In 1999, her own exchange was filmed by the Food Network. The episode aired several times a year over the next five years, and that exposure helped turn Robin’s website into a media monster and cemented her status as “The Cookie Exchange Queen.”
So, what makes for a successful exchange?
Rest assured, you don’t have to know an army of professional bakers to pull off a great party. According to Robin, the key is inviting a good mix of people and following some basic guidelines.
By guidelines, does she mean “rules?” Yes!
“Sometimes I’ll hear from a grumpy hostess asking, ‘How dare I write these rules?’ But I can’t tell you how many times I’ve heard from people who go to an exchange and then say they won’t come next year because the cookies were crummy.
“Nobody had ever written any rules or guidelines for this kind of party, but if you don’t give guidelines, you’ll get a lot of Tollhouse cookies or, worst-case scenario, Chips Ahoy,” laughs Robin.
“More cookie exchanges die than thrive. In the mid-‘90s, I noticed a big drop in quality, so I decided I was either going to quit having an exchange or write some rules,” explains Robin, who’s hosting her 22nd exchange party this month. “If you don’t have some guidelines, you’ll lose all your best bakers. Someone who brings hand-decorated gingerbread cookies doesn’t want to go home with Rice Krispie treats.”
The other essential ingredient of a great exchange is the people.
“The people should be the stars of the show. You can take people from completely diverse backgrounds who seemingly have nothing in common, but because they’ve had to do this one thing to get through the front door, they become instant friends,” says Robin. “After 22 years, I have people who greet each other like old friends even though the only time they see each other is at my party each year.”
Don’t think you know enough people? Not to worry.
Robin finds that many hosts are keen on the idea of launching an annual tradition and says some of the best exchanges happen when you’ve moved to a new neighborhood. It’s a great way to meet people and show hospitality at the same time.
Ready to host your own exchange? Read on for the “rules,” helpful suggestions and tasty recipes!
Throwing a Cookie Party
Getting ready:
Decide on a theme, and send out invitations early. Remind guests to bring a container to take home cookies and to bring printed copies of their cookie recipe.
Plan a menu.
Bake your own cookies, and store them in an airtight container before the party.
Decorate house and gather tableware, accessories, candles, etc.
Cook appetizers or food that can be frozen or stored without compromising quality.
Set up buffet table(s) for your guests to display their cookies. If possible, provide tiered serving trays or stands so cookies can be displayed at different heights for a prettier presentation.
Party time:
Display cookies on the arranged table(s), and be sure to take photos before the swap takes place.
Put out recipes by each cookie plate.
Allow time for guests to mingle, socialize and eat.
When it’s time to “swap”, call the party to order and gather around the cookie table(s). Take turns as each guest introduces themselves and tells a brief anecdote about their cookie recipe.
Swap! Everyone goes around the table, at the same time, in the same direction and takes three to five cookies from each plate until all cookies are gone.
“Rules” of the Cookie Exchange
All cookies should be homemade, and their main ingredient must be flour.
No plain chocolate chip cookies, cookie mixes, no-bakes, meringues* or bars.
Bring 6 dozen total cookies.
Have a theme.
Arrange cookies in a basket or platter, and be creative! Bring a large container to carry away your cookies.
Email a copy of your recipe before the party or bring recipe to the party.
Party theme attire is encouraged!
RSVP as soon as you can, and let the hostess know what type of cookies you are planning on baking—no duplicate recipes are allowed.
If you don’t have time to bake or have burnt your cookies, but still want to attend, go to a real bakery and buy 6 dozen yummy cookies.
*The meringue recipes within the story were so yummy and beautifully decorated that we just couldn’t resist! You be the judge on what type of cookies are appropriate to have at your party.
Source: Robin Olson, cookie-exchange.com
Making it Charitable
 For one hostess in Ocala, hosting a cookie exchange evolved into a charity event.
Marion Montanari will host her 11th cookie swap this month, and the party has come a long way from its early beginnings.
“I like to have it the first weekend of December to give a kick start to the season. It’s grown from about 15 to 20 women the first year, and now we have 60 to 65 coming,” says Marion, who serves a light buffet meal at her event. “There are a lot of husbands who ask me, ‘When are you having the cookie party?’ They know their wives are going to come home with a great variety of cookies. It’s like going to a big bakery.”
Marion is active in a number of charitable causes, so it was only natural that she looked at her party as a way to help others.
“At first, it was just a cookie exchange, but then I got the idea, why not give cookies to charity?”
Marion’s guests each take home cookies, but because so many attend, there is an overabundance of cookies, so some are delivered to area shelters.
“Last year, we took more than 170 dozen cookies that were divided between the Women’s Abuse Center, Brother’s Keeper and Senior Services,” says Marion.
“We’re known as ‘the cookie people’ at these shelters. People give money to charity, and that’s great, but this is giving something homemade, and I think that brings some comfort and touches hearts. It’s the idea that you can help with your own hands.”
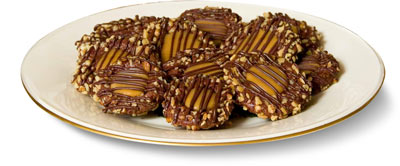
Chocolate Caramel Treasures
1 stick unsalted butter, softened
2⁄3 cup sugar
1 large egg yolk
2 tablespoons whole milk
1 teaspoon vanilla
1 cup all-purpose flour
1⁄3 cup Dutch-process unsweetened cocoa powder
¼ teaspoon salt
1 large egg white, lightly beaten
½ cup finely chopped hazelnuts (or other nuts)
Caramel filling:
10 (1×1/2-inch) plain caramels, unwrapped
2 tablespoons heavy cream
Chocolate drizzle:
3 ounces fine-quality semi-sweet or bittersweet chocolate (not unsweetened) finely chopped
1. Beat together butter, sugar, yolk, milk and vanilla with an electric mixer until well blended. Sift in flour, cocoa and salt and beat on low speed until mixture forms a dough. Chill, wrapped in plastic wrap, until firm—at least 30 minutes.
2. Heat oven to 350°F.
3. Roll scant tablespoons of dough into balls, then coat with egg white, letting excess drip off, and roll in nuts to coat. Arrange balls, as coated, 1 ½ inches apart on greased baking sheets, and press your thumb into center of balls to flatten, leaving a depression. Bake in batches in middle of oven until puffed slightly but centers are soft—10 to 12 minutes. Remove from oven, and immediately press centers of cookies again (we use handle end of a wooden spoon). Transfer to racks to cool. Make filling while cookies cool.
4. Heat caramels and cream in a small saucepan over moderately low heat, stirring occasionally, until melted and mixture is smooth. Spoon into centers of cookies and cool completely.
5. Make chocolate drizzle one hour before serving. Melt chocolate in a double boiler, stirring until smooth. Cool to warm, and pour into a heavy-duty sealable plastic bag. Seal bag and snip one corner to form a small hole. Drizzle chocolate over the cookies, and let stand until set—about 30 minutes.
Source: The Cookie Party Cookbook: The Ultimate Guide to Hosting a Cookie Exchange

Standing Ovation Cookies
8 ounces soft cream cheese
1 cup butter, softened
2 cups flour
Jam (my pick: seedless red raspberry OR apricot, but you can use any you like)
Powdered sugar
1. Mix together the cream cheese, butter and flour. Divide into two sections; form dough into discs, wrap in plastic and refrigerate until firm enough to roll.
2. Preheat oven to 375° F.
3. Dust a sheet of wax paper lightly with flour. Working with one disc at a time, roll out into a square between two sheets of wax paper until dough is about ⅛-inch thick. Cut the large square of dough into squares that are approximately 1½ inches. Place about a teaspoon of jam in the center of each small square. Fold opposite corners of each square to the center and overlap, pressing ends slightly to stick.
4. Place carefully onto a cookie sheet lined with parchment paper. Bake 20 minutes or until firm and bottoms are lightly golden brown. Remove to wire rack to cool.
5. Once cool, sprinkle liberally with powdered sugar
Peppermint Meringues
3 egg whites
¾ cup superfine sugar
Pinch of cream of tartar
Pinch of salt
Peppermint extract
Red food coloring
1. Beat 3 egg whites until frothy.
2. Beat in ¾ cup superfine sugar and a pinch each of cream of tartar and salt until stiff peaks form.
3. Add 1 teaspoon peppermint extract, and swirl in 2 drops red food coloring.
4. Drop by tablespoonfuls, and bake about 1 hour at 300° F.
5. Turn off the oven, and keep meringues inside for 2 hours to dry.
Source: Food Network Magazine
Meringue Swirls
3 large egg whites, at room temperature
Pinch of salt
¼ teaspoon cream of tartar
¾ cup superfine sugar
1 vanilla bean, split lengthwise (or use 1/4 teaspoon vanilla extract)
Coarse sugar crystals and/or silver nonpareils, for sprinkling
1. Preheat oven to 250° F. Line 2 baking sheets with parchment paper. Beat the egg whites and salt in a large bowl with a mixer on medium speed until frothy (use the whisk attachment if using a stand mixer). Add the cream of tartar; increase the speed to medium high and add the superfine sugar, 1 tablespoon at a time. Scrape the seeds from the vanilla bean into the meringue (or add the extract) and continue beating until the sugar is dissolved and the meringue is thick, glossy and forms stiff peaks, about 6 minutes.
2. Fit a piping bag with a large star tip. Fill the bag with the meringue, and pipe spirals on the prepared baking sheets, about 1 inch apart. Sprinkle with the coarse sugar.
3. Bake 1 hour, then turn off the oven and let the meringues stand in the oven until dry, about 2 hours. Store in an airtight container up to 1 week.
Source: Food Network Magazine
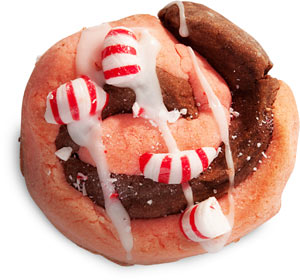
Chocolate Peppermint Pinwheel Cookies
Basic dough:
3 cups all-purpose flour
¾ teaspoon baking powder
¼ teaspoon salt
1 cup unsalted butter, softened
1 cup sugar
1 egg, beaten
1 tablespoon milk
powdered sugar, for rolling out dough
Chocolate:
3 ounces unsweetened chocolate, melted
1 teaspoon vanilla extract
Peppermint:
1 egg yolk
1 teaspoon peppermint extract
½ cup crushed candy canes or ½ cup peppermint candy
Red food coloring (optional)
1. Sift together flour, baking powder, and salt. Set aside.
2. Place butter and sugar in large bowl of electric stand mixer and beat until light and fluffy. Add egg and milk and beat to combine. Put mixer on low speed, gradually add flour, and beat until mixture pulls away from the side of the bowl. The dough will be very stiff and crumbly at this point.
3. Divide the dough in half and add chocolate and vanilla to 1 half and incorporate with hands. Add egg yolk, peppermint extract and crushed candy to other half of dough and incorporate with hands. (If you like, you can add a drop or two of red food coloring to make the dough a peppermint pink.) Cover both with plastic and chill for approximately 5 to 10 minutes.
4. Roll out doughs separately to approximately ¼-inch thickness. Place peppermint dough on top of chocolate and press together around the edges. Using waxed paper or a flexible cutting board underneath, roll dough into log. Wrap in wax paper and refrigerate for 2 hours or more.
5. Preheat oven to 375 degrees.
6. Remove dough from the refrigerator and cut into ¼-inch slices. Place cookies 1-inch apart on greased baking sheet, parchment, or silicone baking mat and bake for 12 to 13 minutes, rotating the pan halfway through cooking time. Remove from oven and let sit on baking sheet for 2 minutes, then move to a wire rack to cool completely.
7. Store in an airtight container for up to 1 week.
Source: Food.com
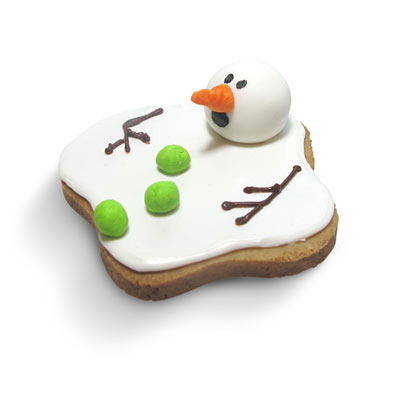
Melting Snowman Cookie
Courtesy of Meaghan Mountford, thedecoratedcookie.com
Basic sugar cookie dough
Royal icing
Frosting
Gel paste food coloring (bright white, orange, electric green or any color for buttons)
Sharp knife
Decorating bag filled with coupler and 4 tip
Small spatula or knife
White rolled fondant
Black and brown gourmet writer
Light corn syrup
1. Roll out your dough and cut out 4-inch blob shape with a sharp knife. Bake on a parchment paper lined baking tray and let cool.
2. Color some frosting with bright white gel paste and fill the bag with the 4 tip. Outline cookie with frosting and let set for 30 minutes. In a bowl, color some frosting white and add water, little by little, stirring until it’s syrupy. Pour the frosting onto the middle of the cookie and spread to the edges with a small spatula. Let set for at least two hours.
3. Knead a few teaspoons of fondant and roll between your palms to form a sphere. If the fondant gets too sticky, let it sit for 10 to 15 minutes. Set on a piece of parchment or wax paper to harden for about an hour. Do the same with the carrot and buttons. Knead a small amount of fondant with the orange color and form a triangle with your fingers. Set on the wax paper so the tip of the carrot points upward. Knead any color into fondant and roll small spheres for buttons.
5. When the snowman head has dried, make your face with a black edible gourmet pen.
6. To adhere the fondant pieces together and to the cookie, dab your finger in light corn syrup and rub on the areas that will be adhered. Start with the head and press firmly but gently onto the blob. Next, attach the carrot to the face and then the buttons. Use a brown or black edible pen to draw the sticks.
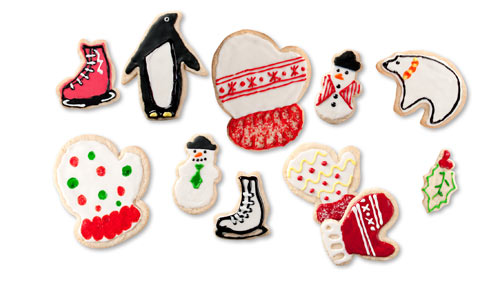
Sugar Cookie Decorating Tips
To make cute and creative decorated cutouts like the ones you see here (we baked and decorated these at the Ocala Style office), start with your favorite sugar cookie recipe and follow these tips.
To achieve the best consistency, chill dough for at least an hour in the refrigerator.
Frequently dust everything with flour—the surface, rolling pin and cookie cutters—to ensure the dough won’t stick.
For easy removal, line baking sheets with parchment paper.
Use a thin spatula, dipped in flour, to transfer cookies to baking sheet.
Make sure cookies are completely cooled before decorating.
Cookies: Made-to-Order
Don’t want to bake your own cookies? We’ve got several options for people who are strapped for time or aren’t so confident in their baking abilities. Whether you buy from a local baker or order specialty cookies online, these treats will get you ready for the party and you won’t have to worry about making a kitchen blunder!

Often mistaken as the coconut cookie macaroon, these sandwich cookies made of almond meal with a creamy ganache are a sweet sight on any dessert table. Darling to look at but temperamental to bake, have New York City’s Macaron Café mail you a box (complete with your own recipe book) to make your party très en vogue. Order a box at macaroncafe.com.

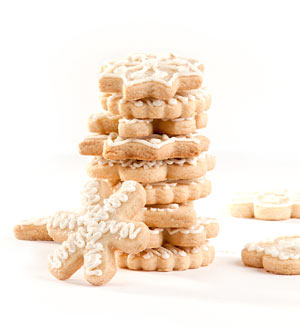
Nothing says tradition like a plate of sugar cookies. These snowflakes will get you into the wintry spirit with their intricate detail. Rolling Pin Productions, the baker of this snowy ensemble, can make other designs to suit any occasion. You can also have photo cookies or monogrammed cookies custom made for any celebration. Visit rollingpinproductions.com.
Buttery and crumbly, shortbread cookies are the perfect companion to a cup of tea or mug of hot chocolate. Make them plain or decorate them like The Sidewalk Cookie and Cake Company. The company is up and coming and is in association with Ocala’s Woodlea Gardens Catering. To request an order, call (352) 690-9699 or visit sidewalkcookieandcake.com.

Cute little gingerbread boys and girls are fun to decorate and personalize with teeny icing eyes and candy buttons. We had ours specially made at Ocala’s Betty Cakes, which specializes in baking all types of cookies and cakes. Make your own or have your gingerbread family made-to-order by calling (352) 622-3727 or visiting bettycakesbettycakes.com.
Must-Have Decorating Supplies
Sanding sugar
Icing tubes
Candy confetti
Edible glitter
Sprinkles
Sugar pearls
Food coloring


